Building LLMBench
Jan 6, 2026 - ⧖ 9.0 minI recently built LLMBench, a CLI tool for benchmarking Large Language Models. This project came from a place of frustration: popular LLM benchmarks don't reflect the actual effectiveness of the models and wanted to build something I could actually rely on. In this post, I'll walk through why I built it, how it works, and what I've learned from using it.
The Problem: I Don't Trust LLM Benchmarks
Large Language Models seem overhyped. Every week there's a new model claiming to be "state-of-the-art" on some benchmark, but when I actually use these models, the results don't match the marketing. The benchmarks feel like marketing material rather than useful metrics.
Here's what bothers me about existing LLM benchmarks:
- Cherry-picked tasks: Benchmarks often focus on tasks that make the model look good, ignoring real-world use cases.
- No transparency: You can't see what the model actually said, only how it scored.
- Static datasets: Many benchmarks use fixed datasets that models may have been trained on, creating a false sense of capability.
I wanted something different. I wanted a tool where I could:
- See exactly what prompts are being sent
- Read the actual responses from each model
- Define my own evaluation criteria
- Compare models on tasks that matter to me
- Iterate on prompt engineering and see real results
So I built LLMBench.
Project Overview
LLMBench is a Rust CLI tool that benchmarks LLMs via the OpenRouter API. It sends predefined prompts to various models, evaluates responses against expected outcomes, and reports pass/fail rates along with token usage and costs.
The project is structured around a few key concepts:
- Benchmarks: Individual test cases that send prompts to models and capture responses
- Evaluators: Functions that score model responses against expected outcomes
- Persistence: Results are saved to disk so you don't re-run completed tasks
- Concurrent execution: Run multiple benchmarks and models in parallel
Architecture
The core of LLMBench is built around a plugin system using Rust's linkme crate for distributed slices. This means adding new benchmarks doesn't require modifying any central registry code.
Benchmark Registration
Benchmarks register themselves using a distributed slice:
# [ distributed_slice ]
pub static BENCHMARKS : [ BenchInit ]; Each benchmark module provides an initialization function that gets collected at compile time. This is the same pattern used for evaluators:
# [ distributed_slice ]
pub static EVALUATORS : [ EvaluatorInit ]; This design makes the system extensible. You can add a new benchmark by creating a new module, and it automatically becomes available without touching any other code.
The Benchmark Lifecycle
A benchmark in LLMBench follows this flow:
- Registration: The benchmark registers itself via the distributed slice
- Execution: The benchmark sends prompts to the LLM API
- Persistence: Results are saved to disk as NDJSON
- Evaluation: An evaluator scores the responses against expected outcomes
Here's what a simple benchmark looks like:
impl_simple_bench! (
"decision_making/grocery_shopping__naive" ,
r#"I need to bake a cake but aren't sure if I need any ingredients.
Here's what I have on-hand:
- 1 cup white sugar
- ½ cup unsalted butter, softened
- 2 large eggs, room temperature
- 2 teaspoons vanilla extract
- 1 oz of all-purpose flour
- 1 ¾ teaspoons baking powder
- 1/4 teaspoon table salt
- ½ cup whole milk, room temperature
# **OUTPUT FORMAT**
A single line with the item to buy from the store. No additional commentary.
"# ,
expect_response! ( "all-purpose flour" )
); This benchmark tests whether a model can figure out what the user wants based on a list of possible options. The correct answer is "all-purpose flour" because 1 ounce of flour isn't enough to bake a cake. This recipe was the first result from a web search, so an LLM should almost certainly be able to get this correct.
The macros are provided as a convenient way for simple request-response interactions. For multi-turn interactions, there are extension traits that define some helper methods to reduce the amount of code to write.
Evaluators
Evaluators are functions that take model responses and return a score:
fn eval ( responses : & [ Choice ]) -> Score {
match responses {
[ a] => match a. get_message () {
Some ( a) => {
let answer = a. lowercase ()
. remove_chat_tags ()
. alphanumeric_only ()
. trim () == "all-purpose flour" ;
Score :: builder (). passed ( answer). build ()
}
_ => Score :: fail (),
},
_ => Score :: fail (),
}
} The evaluator normalizes the response (lowercase, removes chat tags, alphanumeric only) and checks if it matches the expected answer. This is flexible allowing you to write evaluators consisting of complex parsing, semantic matching, or any other logic you need.
Usage
Running Benchmarks
To run all benchmarks on all configured models:
cargo run --release -- benchTo run specific benchmarks with select models:
cargo run --release -- bench \
       -m "x-ai/grok-4.1-fast" \
       -m "qwen/qwen3-coder" \
       --n-runs 2 \
       decision_making/grocery_shopping__naive
The tool supports:
- Selecting specific models with
-m - Selecting model groups (defined in the config) with
-g. This is useful when comparing between frontier models versus edge models, for example. - Running multiple iterations with
--n-runs. LLMBench defaults to 3 runs per prompt. - Running specific benchmarks
LLMBench only runs benchmarks that haven't been ran yet for a specific model. This also includes the number of runs. So if you ran 2 benches for a model-bench combination, and later decide to do --n-runs 3, only 1 bench will be ran for that specific combination.
Evaluating Results
After running benchmarks, evaluate the results:
cargo run --release -- evalEvaluation results are calculated on each call to eval and produces a color-coded table showing pass/fail status, token usage, and costs:
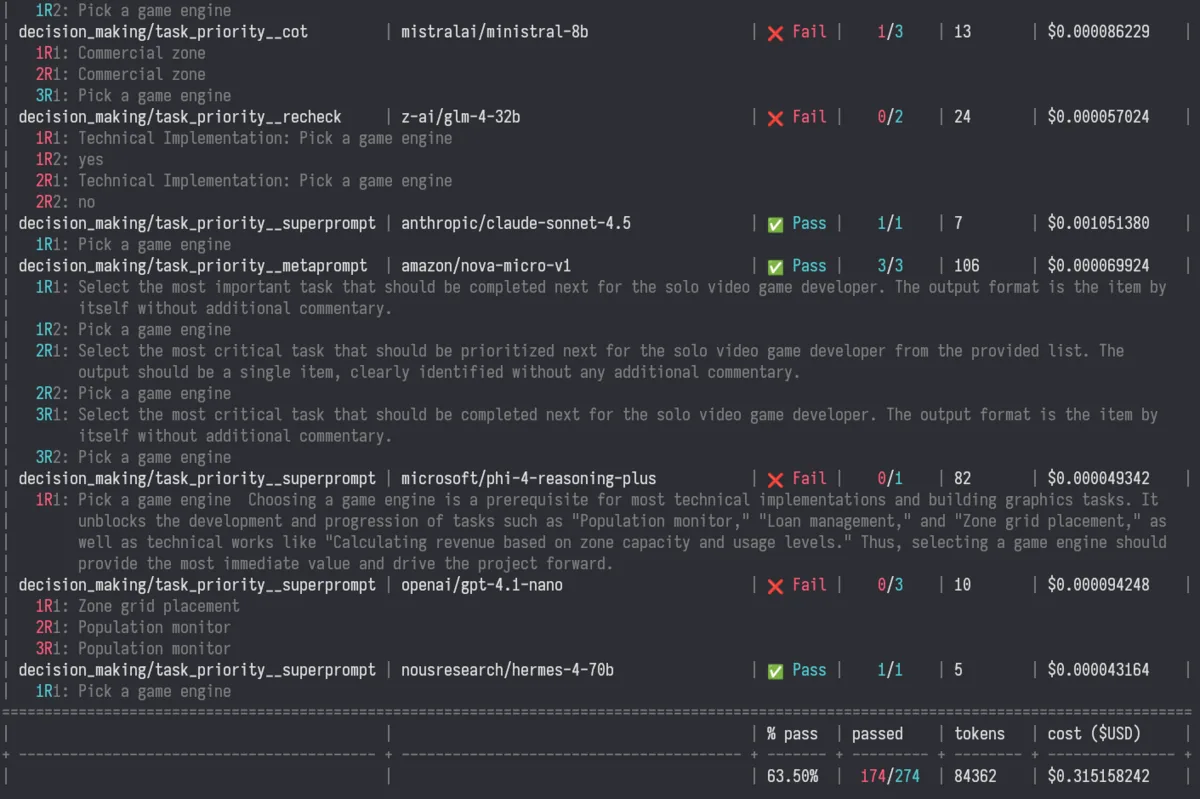
The output shows:
- Benchmark + model combination
- Pass/fail status (cyan for pass, red for fail)
- Total number of runs
- Token usage and cost
- The responses from each model, and whether the particular run passed or failed
For multi-turn benchmarks, you can see each turn's response:
 | decision_making/grocery_shopping__naive     | microsoft/phi-3.5-mini-128k-instruct     | ❌ Fail |    0/3    | 71       | $0.000099891    |
 |   1R1:  run 1(passed), output from first turn
 |   1R2:  run 1(passed), output from second turn
 |   2R1:  run 2(failed), output from first turn
 |   2R2:  run 2(failed), output from second turn
What I've Learned
Using LLMBench has been eye-opening. Here are some observations from running benchmarks across different models:
Prompt Engineering Matters More Than Model Choice
I've found that the way you phrase a prompt often has a bigger impact on results than which model you use. For example, I created several variants of the task priority benchmark:
- Naive: Just asks the question directly
- Chain-of-Thought: Asks the model to "think through your answer step by step"
- Meta-prompt: Requires the model to generate a Meta-prompt, and then answer the question using that Meta-prompt.
- Super-prompt: As if you asked the question multiple times and slowly tweaked your question each time to nudge it in the right direction.
- Recheck: Asks the model to verify its answer
The results vary significantly across these approaches, sometimes more than the variation between models. This suggests that prompt engineering is a critical skill that can be more important than model selection.
Here are the pass rates for different prompting styles:
- Naive:
60% - Chain-of-Thought:
69% - Meta-prompt:
70%(This would likely be higher for a pre-generated Meta-prompt, but I also required the model to generate the Meta-prompt itself. Smaller models struggle to do this.) - Super-prompt:
86% - Recheck:
12%(definitely don't ask a model to check it's answer)
Consistency is a Problem
Running the same benchmark multiple times on the same model often yields different results. This is expected with LLMs due to temperature settings, but it makes benchmarking tricky. I've settled on running each benchmark 3 times and looking at the pass rate. 3 feels like a good number because that's probably the maximum number of times that I would try sending the same prompt before trying something else (I usually max out at 2, but sometimes use 3 if it's obvious one of the generations went off the rails).
Design Decisions
Why OpenRouter?
OpenRouter provides a unified API for many different LLM providers. This means I can benchmark models from Anthropic, OpenAI, Google, Meta, and others without writing separate API integrations for each. Plus, I use OpenRouter in my IDE anyway so my account is already loaded and ready to go.
Why NDJSON for Persistence?
Results are stored as newline-delimited JSON (NDJSON). This format is:
- Easy to append to (just write a new line)
- Simple to parse (one JSON object per line)
- Human-readable (you can
cat results.ndjsonand see what's there) - Efficient (no need to load the entire file into memory)
Conclusion
LLMBench isn't trying to be the definitive LLM benchmark. It's a tool I built for myself because I stopped trusting the existing ones. What makes it different is transparency: I can see exactly what's being tested, read the actual responses, and gain a better understanding of how models respond given various prompts. This helps educate me on which models to choose for which tasks.
The tool has already taught me that prompt engineering is often more important than model choice, that expensive models don't always perform better, and that consistency is a major challenge in LLM evaluation.
If you're also skeptical of LLM benchmarks and want to build your own evaluation framework, I hope LLMBench provides a useful starting point. The code is open source, and adding new benchmarks is straightforward.
At the end of the day, the only benchmark that matters is whether the model helps you do what you need to do. Everything else is just marketing.